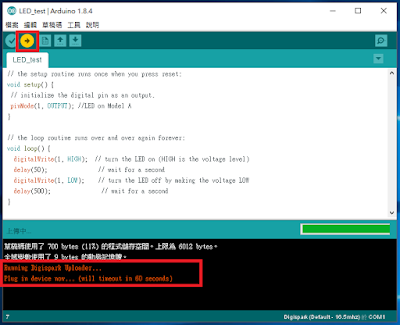
由於是第一次使用Digispark,我們採用最簡單的LED亮滅來做這次的實驗
1.先將程式碼貼進Arduino IDE中
程式碼如下:
 1
 2 // the setup routine runs once when you press reset:
 3 void setup() {
 4
 5   pinMode(1, OUTPUT); //設定PIN1(LED)為OUTPUT
 6 }
 7
 8 // the loop routine runs over and over again forever:
 9 void loop() {
10   digitalWrite(1, HIGH);  // turn the LED on (HIGH is the voltage level)
11   delay(500);              // wait for a second
12   digitalWrite(1, LOW);   // turn the LED off by making the voltage LOW
13   delay(500);             // wait for a second
14 }
15
2.按下上傳,這個動作在IDE中會先編譯,完成後再上傳
(在這之前,請不要將Digispark插在USB上)

3.編譯完成會看到如下訊息,此時必須在60秒內將Digispark插入USB Port
草稿碼使用了 700 bytes (11%) 的程式儲存空間。上限為 6012 bytes。
全域變數使用了 9 bytes 的動態記憶體。
Running Digispark Uploader...
Plug in device now... (will timeout in 60 seconds)
4.IDE偵測到Digispark插入USB Port,會自動將我們前面編譯的程式碼,狀態如下
上傳到Digispark,並且自動開始執行,這時候我們會看到開發板上的LED一閃一閃的
草稿碼使用了 700 bytes (11%) 的程式儲存空間。上限為 6012 bytes。
全域變數使用了 9 bytes 的動態記憶體。
Running Digispark Uploader...
Plug in device now... (will timeout in 60 seconds)
> Please plug in the device ...
> Press CTRL+C to terminate the program.
> Device is found!
connecting: 16% complete
connecting: 22% complete
connecting: 28% complete
connecting: 33% complete
> Device has firmware version 1.6
> Available space for user applications: 6012 bytes
> Suggested sleep time between sending pages: 8ms
> Whole page count: 94  page size: 64
> Erase function sleep duration: 752ms
parsing: 50% complete
> Erasing the memory ...
erasing: 55% complete
erasing: 60% complete
erasing: 65% complete
> Starting to upload ...
writing: 70% complete
writing: 75% complete
writing: 80% complete
> Starting the user app ...
running: 100% complete
>> Micronucleus done. Thank you!
程式載入後的效果如下


沒有留言:
張貼留言